
මේක ගැන නම් වැඩි විස්තරයක් ඕනේ නෑනේ. Protected Folder එකක් ඇතුලට අපිට ඕනෙ Files දාන්න පුලුවන්.
මේක Web hosting වල 4 වෙනි Post එක. කලින් Post වල දැනුම මේකට ඕනෙ වෙනවා. ඒවා මතක නැත්නම්
Webhost කොහොමද ? : 2 කොටස
http://knowltofriend.blogspot.com/2014/07/webhost.html
File ගොඩක් එකපාර Hosting Space එකට Upload කරන්න : 3 කොටස
http://knowltofriend.blogspot.com/2014/10/file-hosting-space-upload-3.html
1. Cpanel එකේ Password Protect Directories වලට යන්න

2. මේ වගේ Page එකකට එනවා.
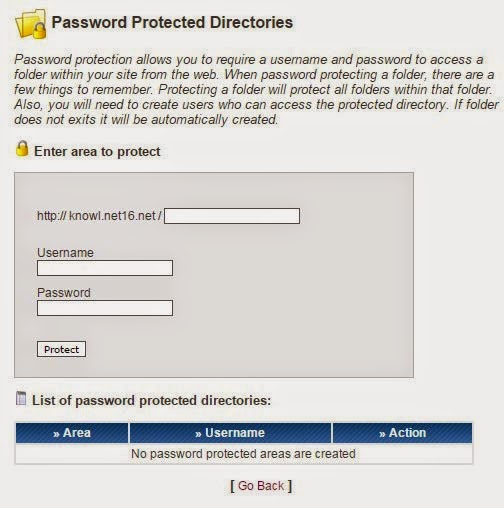

3. මුලින්ම ඔයාගෙ Site එකේ address එක තියනවා. එතන secretFolder කියල type කරන්න. මේක තමයි අපේ Password Protected Folder එක. පහල තියන Username, Password වලට මොකක්හරි type කරන්න. මේ Username, Password ඕනෙ වෙනවා මේ folder එකට යන්න. Protect Click කරන්න.

4. වැඩේ හරි ගිහින් නම් මේ වගේ පෙන්නනවා

File manager එකෙන් හරි FTP (කලින් post එකේදී කරපු එක. තව ටිකකින් අපි මේකෙන් file ටික upload කරනවා ) වලින් හරි public_html Folder එකට ගිහින් බලන්න, secretFolder එක හැදිලා ඇති.
5. දැන් Upload කරන්න ඕනෙ File ටික හදමු.
Password Protected Folder එකට දාන ඒවා
I. secretphotos.html - මේකෙ තියෙන්නේ photos කියන folder එකේ තියන g.jpg පින්තූරය පෙන්නන්න කියලා විතරයි. එකේ Size එක වෙනස් කරලා තියනවා.
<html>
<head><title>Secret Photo</title></head>
<body>
<img src="photos/g.jpg" width="350" height="424">
</body>
</html>
II. photos කියන folder එක ඇතුලට g.jpg පින්තූරය දාලා තියනවා.
අපේ හොර File ටික මේවා විතරයි.
III.index.html – මේකෙ තියෙන්නේ secretFolder කියන Folder එකේ secretphotoes.html File එකට link එකක් විතරයි ( secretFolder කියන්නේ අපේ Password Protected Folder එක) මේක upload කරන්නේ public_html Folder එකට.
<html>
<head><title>Secret Photo</title></head>
<body>
<a href="secretFolder/secretphotos.html">Secret Area</a>
</body>
</html>
දැන් ඔයාට තේරනවා ඇති
secretFolder – මේක තමයි අපේ Password Protected Folder එක.
මේක ඇතුලට දාලා තියනවා secretphotos.html එක. මේකෙන් කරන්නේ photos Folder එකේ තියන g.jpg පින්තුරය පෙන්නන එක.
index.html – මේකෙන් කරන්නේ secretphotos.html File එකට Link එකක් දෙන එක.

6. secretFolder එකට (public_html Folder එකේ හැදිලා ඇති )
secretphotos.html File එක,
photos Folder එක සහ ඒක ඇතුලට g.jpg පින්තූරය upload කරන්න.
public_html Folder එකට index.html upload කරන්න
මම මේවා upload කරන්නේ FTP වලින්. අමතක අය කලින් post එක බලන්න. File Manager වලිනුත් පුලුවන්. කැමති විදිහට කරන්න.


7. මේවා ටික හරියට upload කලා නම් වැඩේ ඉවරයි. ඔයාගේ Site එකට යන්න.


මේ index.html File එක පෙන්නන විදිහ.
8. Secret Area Click කරන්න.

9. Username , Password හරියට type කරන්න. ඔයා Protect කරපු ඒවා බලන්න පුලුවන්.

Comment එකක් දාලම යන්න. Thank you………
secretphotos.html File එක,
photos Folder එක සහ ඒක ඇතුලට g.jpg පින්තූරය upload කරන්න.
public_html Folder එකට index.html upload කරන්න
secretFolder එක අස්සේ තියන .htpasswd සහ .htaccess Delete කරන්න එපා.
මම මේවා upload කරන්නේ FTP වලින්. අමතක අය කලින් post එක බලන්න. File Manager වලිනුත් පුලුවන්. කැමති විදිහට කරන්න.
7. මේවා ටික හරියට upload කලා නම් වැඩේ ඉවරයි. ඔයාගේ Site එකට යන්න.
මේ index.html File එක පෙන්නන විදිහ.
8. Secret Area Click කරන්න.
Comment එකක් දාලම යන්න. Thank you………
No comments:
Post a Comment